Crochet Bag Design: A Maker’s Guide to Trends, Stitches, and Patterns for 2026
Crochet bags have moved well past the occasional market tote…
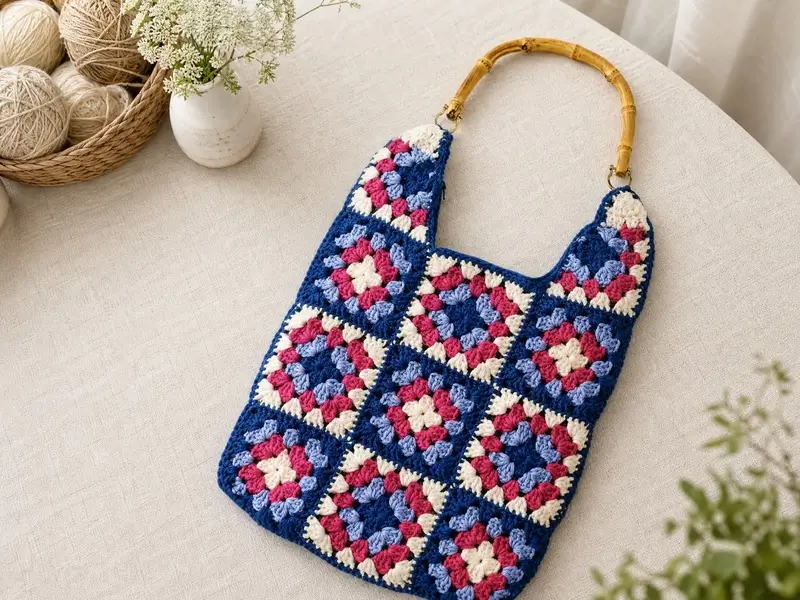
Crochet bags have moved well past the occasional market tote — they’re showing up as genuine fashion pieces, with bag crochet design now taking cues from runway handbag silhouettes rather than sticking to purely functional shapes. Whether you’re planning your first crochet bag or looking to update your go-to pattern for what’s trending in 2026, the fundamentals of a bag that holds its shape and looks intentional come down to a handful of choices: stitch, yarn weight, and structure.
As someone who spends a lot of time around crochet bag patterns, the questions that come up most are about what’s actually trending right now versus what’s a passing fad, which stitch genuinely holds up under the weight of daily use, and what makes a pattern popular enough to become a go-to rather than a one-time make. This guide covers all of it, with a featured design example to show the principles in action.
Key Takeaways
-
- 2026’s crochet bag trends lean toward structured, textured silhouettes — granny square panels and mixed-stitch designs are holding strong rather than fading out.
-
- Denser, tighter stitches like single crochet hold up better as a crochet bag pattern for straps and high-wear areas than looser, more open stitches.
-
- A well-lined bag with a rigid or semi-rigid base outlasts and holds shape better than an unlined one, regardless of which stitch pattern you choose.
-
- The most popular crochet tote bag pattern styles combine a classic technique (like granny squares) with a modern element — a structured handle, a zip closure, or a defined base.
-
- A featured granny square bag design is broken down below to show how these principles come together in a real bag.
What’s Trending in Crochet Bag Design for 2026?
Structured, patchwork-style bags are the clearest trend carrying into 2026 — granny squares in particular haven’t gone anywhere, but they’re increasingly paired with firmer construction elements like rigid handles, defined bases, and interior linings that give the finished piece more of a handbag silhouette than a purely soft, floppy tote. Colour-blocked panels and mixed-stitch textures (combining a dense stitch for structure with an open, lacy stitch as an accent) are also showing up frequently in what’s considered current bag crochet design.
As for the single highest-selling category within crochet more broadly, market and tote-style bags remain consistently strong sellers — they’re practical enough for everyday use while still showcasing the kind of visible stitch detail that makes handmade crochet stand out, which is a big part of their ongoing popularity.
What’s the Best Crochet Stitch for a Bag?
For the body of a crochet bag, denser stitches like single crochet or half double crochet hold up better than more open, lacy stitches, since a bag needs to resist stretching out of shape under the weight of whatever’s inside it. Granny square construction strikes a nice middle ground — the individual squares are worked in a slightly more open pattern, but joining multiple squares together, especially with a lining behind them, gives the finished panel enough structure to function well as a bag rather than sagging.
For straps and handles specifically, a tighter stitch is even more important, since that’s the area under the most direct strain. Many crochet bag patterns solve this by using a rigid handle — wood, bamboo, or acrylic — attached to the crocheted body instead of relying on crocheted straps alone, which sidesteps the stretching problem entirely for the handle while still showcasing the crochet work on the main body.
What Makes a Crochet Bag Pattern Genuinely Popular?
The patterns that stay popular over time tend to combine a recognizable, satisfying technique — granny squares being the clearest example — with practical details that make the finished bag actually usable day to day: a real closure (zipper rather than an open top), a fabric lining that prevents small items from falling through stitch gaps, and a handle sturdy enough for regular use. A crochet tote bag pattern that skips those practical elements might look good in photos but tends to get set aside once the novelty wears off, while one that accounts for daily use becomes a repeat make.
Featured Design: A Patchwork Granny Square Tote
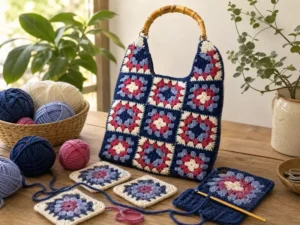
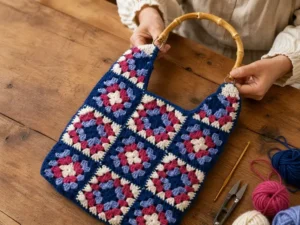
To show these principles in practice, it’s worth looking at how a well-constructed granny square bag comes together. A design like this typically starts with a set of individual granny squares — often 14 or more — worked in a coordinated colour palette (a classic combination is a dark base colour with two or three lighter accent colours arranged in a repeating pattern across each square). The squares are joined into panels for the front and back of the bag, which are then seamed together along the sides and bottom.
What elevates this kind of design from a flat panel into a genuine bag is the finishing work: a fabric lining sewn in to give the interior structure and prevent stretching, a zipper set into the top opening for a secure close, and a rigid handle — commonly bamboo or wood with decorative clips — attached at the top rather than crocheted directly, which keeps the handle from stretching under weight the way a crocheted strap eventually would. The gauge of the granny squares matters more than people expect here too; a tighter gauge produces a firmer panel that holds its shape better once lined, which is worth checking before committing to a full set of squares.
Finished Measurements
Approx 12½”/31.5cm wide x 17″/43cm high (excluding handle)
Materials
-
- 3 balls (1¾ oz/50g each, approx 99yds/91m) of Needful Yarns/Filtes King Extra (wool) in #1100 dark blue (A)
-
- 2 balls each in #2113 cream (B), #1863 light blue (C), and #2007 hot pink (D)
-
- Size H/8 (5mm) crochet hook, or size to obtain gauge
-
- One 7½”/19cm wide x 6″/15cm high bamboo handle with gold handle clips
-
- One 12″/30.5cm matching zipper
-
- ½ yd/.5m of lining fabric
-
- Matching thread
Gauge
One square = 4¼ “/10.5cm using size H/8 (5mm) hook. Take time to check gauge.
Note
All rnds are worked on the RS.
Stitch Glossary
Dc2tog [Yo, insert hook into next st and draw up a lp, yo and draw through 2 lps on hook] twice, yo and draw through all 3 lps on hook.
Dc3tog [Yo, insert hook into next st and draw up lp, yo and draw through 2 lps on hook] 3 times, yo and draw through all 4 lps on hook.
Basic Granny Square
With first color, ch 4. Join ch with a sl st, forming a ring.
Rnd 1 (RS) Ch 3 (counts as 1 dc), work 2 dc in ring, [ch 3, work 3 dc in ring] 3 times, join rnd with a sl st in 3rd ch of beg ch-3. Fasten off.
Rnd 2 Join 2nd color with a sl st in any corner ch-3 sp, ch 3 (counts as 1 dc), work (2 dc, ch 3, 3 dc) in same ch-3 sp, *ch 1, work (3 dc, ch 3, 3 dc) in next corner ch-3 sp; rep from * twice more, ch 1, join rnd with a sl st in 3rd ch of beg ch-3. Fasten off.
Rnd 3 Join 3rd color with a sl st in any corner ch-3 sp, ch 3 (counts as 1 dc), work (2 dc, ch 3, 3 dc) in same ch-3 sp, *ch 1, work 3 dc in next ch-1, work (3 dc, ch 3, 3 dc) in next corner ch-3 sp; rep from * twice more, ch 1, work 3 dc in last ch-1 sp,join rnd with a sl st in 3rd ch of beg ch-3. Fasten off.
Rnd 4 Join 4th color with a sl st in any corner ch-3 sp, ch 3 (counts as 1 dc), work (2 dc, ch 3, 3 dc) in same ch-3 sp, *[ch 1, work 3 dc in next ch-1 sp, twice, ch 1.] work (3 dc, ch 3, 3 dc) in next corner ch-3 sp; rep from * twice more [ch 1, work 3dc in last ch-1 sp]twice, join rnd with a sl st in 3rd ch of beg ch-3. Fasten off. Make 14 squares (7 front and 7 back); foll placement diagram for colorways.
Bottom Corner Square (make 4)
With B, ch 4. Join ch with a sl st, forming a ring.
Rnd 1 (RS) Rep rnd 1 as for basic square.
Rnd 2 With D, rep rnd 2 as for basic square.
Rnd 3 Join C with a sl st in any corner ch-3 sp, ch 3 (counts as 1 dc), work (2 dc, ch 3, 3 dc) in same ch-3 sp, ch 1, work 3 dc in next ch-1 sp, ch 1, *work (3 dc, ch 3, 3 dc) in next corner ch-3 sp, ch 1, work 3 dc in next ch-1 sp, ch 3, work 3 sc in next ch-3 sp, ch 3, work 3 in next ch-1 sp, ch 1, rep from * to * once more, ch 1, join with sl st in 3rd ch of beg ch-3.Fasten off.
Rnd 4 Join A with a sl st in corner ch-3 sp opposite corner where 3 sc were worked, ch 3 (counts as 1 dc), work (2 dc, ch 3, 3 dc) in same ch-3 sp. [ch 1, work 3 dc in next ch-1 sp] twice, ch 1, work (3 dc, ch 3, 3 dc) in next corner ch-3 sp, ch 1, work 3 dc in next ch-1 sp, ch 1, work 3 sc in next ch-3 sp, ch 1, sc in next sc, work 3 sc in next ch-3 sp, ch 1, work 3 dc in next ch-1 sp, ch 1, work (3dc, ch 3, 3 dc) in next corner ch-3 sp [ch 1, work 3 dc in next ch-1 sp] twice, ch 1, join rnd with a sl st in 3rd ch of beg ch-3. Fasten off.
Right Top Corner Half-Square (make 2)
With A, ch 4. Join ch with a sl st, forming a ring.
Rnd 1 (RS) Rep rnd 1 as for basic square.
Rnd 2 Join C with a sl st in any corner ch-3 sp, ch 3 (counts as 1 dc), work (2 dc, ch 3, 3 dc) in same ch-3 sp, ch 3, sc in next ch-3 sp, ch 3, [work (3 dc, ch 3, 3 dc) in next corner ch-3 sp, ch 1] twice (placing a yarn marker in first ch-3 sp worked), join rnd with a sl st in 3rd ch of beg ch-3. Fasten off.
Row 3 Join D with a sl st in marked corner ch-3 sp, ch 3 (counts as 1 dc), work 3 dc in same ch-3 sp, ch 1, work 3 dc in next ch-1 sp, ch 1, work (3 dc, ch 3, 3 dc) in next corner ch-3 sp, ch 1, work 3 dc in next ch-1 sp, ch 1, work 4 dc in next corner ch-3 sp. Fasten off, leaving rem sts unworked.
Row 5 [Dc2tog] 3 times, dc in top of ch 3 of row 4 — 4 sts. Ch 3, turn.
Row 6 Dc3tog, dc in top of ch 3. Fasten off.
Left Top Corner Half-Square (make 2)
Work as for right top corner half-square until row 3 is completed.
Row 4 (RS) Join B with a sl st in top of beg ch-3 of row 3, ch 3, dc in next 3 dc of rnd 2, dc in ch-3 corner sp of rnd 2, work 2 dc in side edge of dc of row 3, ch 3, sc in top of first dc of row 3, ch 3, [work 3 dc in next ch-1 sp, ch 1] twice, work (3 dc, ch 3, 3 dc) in next corner ch-3 sp, [ch 1, work 3 dc in next ch-1 sp] twice, ch 1, work 4 dc in last dc. Fasten off.
Row 5 With RS facing, join B with a sl st in 3rd ch of beg ch-3 of row 4, ch 3, [dc2tog] 3 times — 4 sts. Ch 3, turn.
Row 6 Dc3tog, dc in top of ch 3. Fasten off.
Finishing
Using A, sc squares together following the diagram, joining squares across first to form strips, then join strips together to form the front (or back) of the bag.
Lining
Fold lining fabric in half, RS facing. Trace the front piece onto the lining fabric. Cut out pieces ½”/1.3cm larger all around. Using a ½”/1.3cm seam allowance, sew the side and bottom seams. Trim seams to ¼”/.5cm. Make 1½”/1.3cm deep clips along the curved edges of the top. Turn the top edge ½”/1.3cm to the WS and press. Set aside.
Edging
With RS facing, join A with a sl st in the top right corner of the bag back.
Row 1 Ch 1, making sure that work lies flat, sc evenly along the entire edge. Fasten off. Repeat for the bag front.
To sc the front and back together, place pieces together, WS facing. Working through both thicknesses, join A with a sl st in the left top corner.
Row 2 Ch 1, making sure that work lies flat, sc evenly across the side and bottom edges, working 3 sc in each bottom corner. Fasten off.
Sew in the zipper. Insert the lining. Sew the top edges of the lining in place, having pressed the edge approx ½”/1.3cm from the zipper teeth. Using A, whipstitch the handle clips to each top corner.
Frequently Asked Questions
What are the hottest bags for 2026?
Structured, patchwork-style crochet bags — granny squares paired with rigid handles, defined bases, and interior linings — are leading the trend.
What are the current crochet trends for 2026?
Mixed-stitch textures, colour-blocked panels, and classic techniques like granny squares updated with more structured, handbag-like construction.
What crochet items are trending now?
Market and tote-style bags remain consistently among the most popular crochet items, thanks to their practicality and visible stitch detail.
What crochet stitch is best for a bag strap?
A tight, dense stitch like single crochet holds up best, though many patterns use a rigid handle instead of a crocheted strap for high-wear durability.
How do you crochet a strong bag?
Use a dense stitch, work at a tighter gauge than you might for a garment, and add a fabric lining to reinforce the structure and prevent stretching.
What is the best crochet stitch for a bag overall?
Single crochet or half double crochet for the body, since both resist stretching better than more open stitch patterns.
What are some popular crochet bag patterns?
Granny square totes with lined interiors and rigid handles are among the most consistently popular styles, balancing classic technique with everyday practicality.
Final Thoughts
Good crochet bag design comes down to balancing the craft you want visible — the stitch pattern, the colourwork — with the practical elements that make a bag genuinely useful: a lining, a secure closure, and a handle that won’t stretch out over time. A granny square tote is a great example of that balance done well, and the same principles apply whether you’re following a pattern or adapting one to your own style.
If you’re working through a crochet tote bag pattern of your own and run into gauge or structure issues, leave a comment — I’m happy to help you figure out where to adjust.