
Crochet Flower Thai Rose: A Maker’s Guide to This Layered, Wire-Stemmed Bloom
Crochet thai rose creation sits in a different category from…
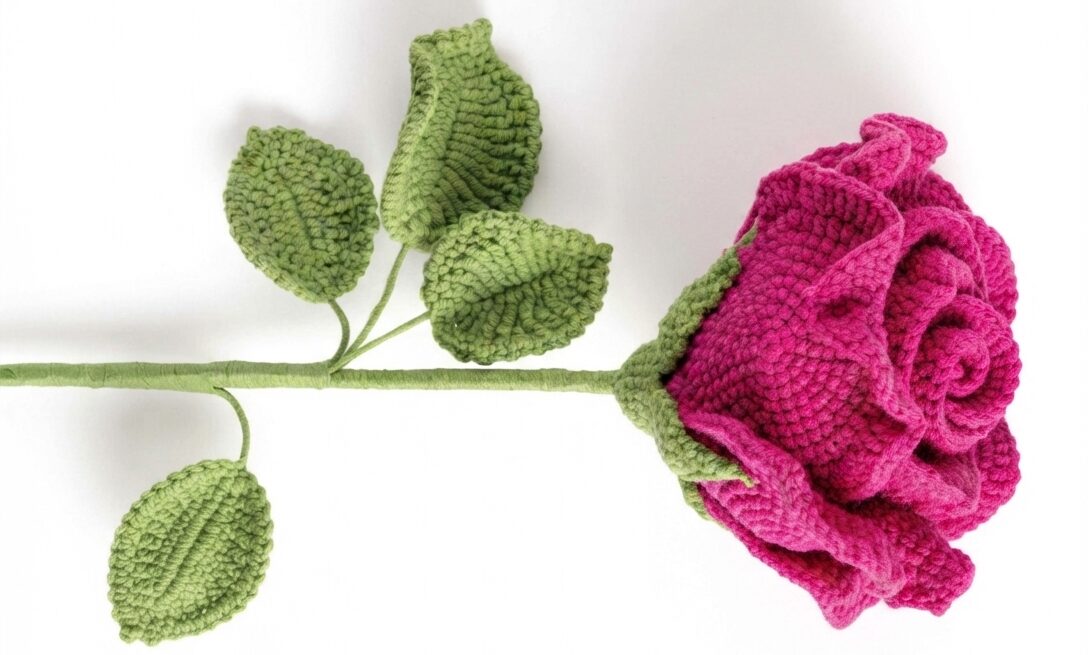
Crochet thai rose creation sits in a different category from the simple, flat motifs most people start with in crochet flowers. Rather than a single round piece, it’s built from multiple layered petals of increasing size, mounted onto a real floral stem and shaped by hand into something that reads far closer to a genuine, dimensional rose than a crocheted approximation of one. It’s more of a small-scale craft project than a quick single-sitting motif — closer to floristry with yarn than to a beginner amigurumi flower.
What makes this style worth the extra time is exactly that dimensionality — because each petal is worked flat and then curved and layered by hand during assembly, you get real depth and movement that a single continuous motif simply can’t replicate. This guide walks through the full pattern for building one from scratch, including the leaves, calyx, and wire-stem assembly that turn a stack of crocheted petals into a finished, displayable rose.
If you want to create a stunning crochet thai rose, patience and layering are key to getting that realistic dimensional look.
Key Takeaways
- A Thai rose is built from separate small, medium, and large petals worked flat, then layered and glued around a floral stem rather than joined into one continuous piece.
- Floral wire inside the leaves lets you bend and pose them naturally, which is what gives the finished flower a lifelike, three-dimensional quality.
- Working the petals in a spiral (amigurumi-style, without joining each round) keeps the fabric smooth, while a stitch marker helps you track where each round begins.
- Hot glue is the standard way to assemble the layers, though hand-stitching is a slower, more precise alternative if you prefer not to work with glue.
- The full pattern — petals, leaves, calyx, and assembly — is included below.
What Makes a Thai Rose Different from Other Crochet Flowers?
Most crochet flower patterns are worked as one flat piece — a ring, a few rounds, and petals formed directly as part of that same continuous motif. A Thai rose takes a different approach entirely: each petal is crocheted as its own separate piece, in three distinct sizes, and the “shaping” of the flower happens during assembly rather than during crocheting. You layer the petals by hand around a wired stem, working from smallest to largest, curving and overlapping each one until it reads as a genuine, blooming rose rather than a flat crocheted shape. That hands-on shaping step is really what defines the style — the crochet work builds the raw materials, but the finished look comes from how you assemble them.
Why Use Floral Wire in the Leaves?
Crocheting directly over floral wire while working the leaf rounds embeds a bendable structure inside the finished piece, which lets you pose the leaves at a natural angle once the flower is fully assembled — curved slightly, angled away from the stem, whatever looks right for your finished arrangement. Without that wire, the leaves would lie flat and rigid, which undercuts the whole point of building a dimensional flower in the first place.
The Pattern: Crochet Thai Rose
Yarn
Cotton or cotton blend, 4-ply, in dark pink (35g/1¼oz) and green (10g/½oz)
Hook
2mm (US 4)
Materials
- 0.5mm floral wire for leaves: 2 x 20cm (8in) lengths
- 3mm floral stem: 1 x 40cm (16in) length
- Hot glue gun
Choosing the right yarn colors for your crochet thai rose makes all the difference between a flat craft and a realistic floral display.
Pattern Note
This pattern uses the amigurumi method of working in a spiral. Join each round with a sl st into the top of the first sc. Use a stitch marker in the first stitch of the round to track where you are, moving it up as you work.
Small Petal (Make 4)
Using dark pink, make a magic ring.
Rnd 1 (RS): 1 ch (does not count as a st throughout), 5 sc into ring, join. (5 sts)
Rnd 2: 1 ch, [2 sc in next st] 5 times, join. (10 sts)
Rnd 3: 1 ch, [1 sc, 2 sc in next st] 5 times, join. (15 sts)
Rnd 4: 1 ch, [1 sc, 2 sc in next st, 1 sc] 5 times, join. (20 sts)
Rnd 5: 1 ch, [3 sc, 2 sc in next st] 5 times, join. (25 sts)
Rnd 6: 1 ch, [2 sc, 2 sc in next st, 2 sc] 5 times, join. (30 sts)
Rnd 7: 1 ch, 11 sc, 2 hdc in next st, 2 hdc, 2 hdc in next st, 2 hdc, 2 hdc in next st, 12 sc, join. (33 sts)
Rnd 8: 1 ch, 11 sc, [2 dc in 1 st] 10 times, 12 sc, join. (43 sts)
Rnd 9: 3 ch (counts as 1 dc), turn, 2 dc in next st, 1 dc, leave remaining sts unworked. (4 sts)
Fasten off and weave in the end.
Medium Petal (Make 4)
Using dark pink, make a magic ring.
Rnd 1 (RS): 1 ch, 5 sc into ring, join. (5 sts)
Rnd 2: 1 ch, [2 sc in next st] 5 times, join. (10 sts)
Rnd 3: 1 ch, [1 sc, 2 sc in next st] 5 times, join. (15 sts)
Rnd 4: 1 ch, [1 sc, 2 sc in next st, 1 sc] 5 times, join. (20 sts)
Rnd 5: 1 ch, [3 sc, 2 sc in next st] 5 times, join. (25 sts)
Rnd 6: 1 ch, [2 sc, 2 sc in next st, 2 sc] 5 times, join. (30 sts)
Rnd 7: 1 ch, [5 sc, 2 sc in next st] 5 times, join. (35 sts)
Rnd 8: 1 ch, 6 sc, [2 hdc in next st, 6 hdc] 3 times, 2 hdc in next st, 7 sc, join. (39 sts)
Rnd 9: 1 ch, 7 dc, [2 dc in next st] 12 times, [2 dc, 2ch-picot, 2 dc] all into next st, [2 dc in next st] 12 times, 7 dc, join. (66 sts, 1 2ch-picot)
Rnd 10: 3 ch (counts as 1 dc), turn, 2 dc in next st, 1 dc, leave remaining sts unworked. (4 sts)
Fasten off and weave in the end.
Large Petal (Make 5)
Using dark pink, make a magic ring.
Rnd 1 (RS): 1 ch, 5 sc into ring, join. (5 sts)
Rnd 2: 1 ch, [2 sc in next st] 5 times, join. (10 sts)
Rnd 3: 1 ch, [1 sc, 2 sc in next st] 5 times, join. (15 sts)
Rnd 4: 1 ch, [1 sc, 2 sc in next st, 1 sc] 5 times, join. (20 sts)
Rnd 5: 1 ch, [3 sc, 2 sc in next st] 5 times, join. (25 sts)
Rnd 6: 1 ch, [2 sc, 2 sc in next st, 2 sc] 5 times, join. (30 sts)
Rnd 7: 1 ch, [5 sc, 2 sc in next st] 5 times, join. (35 sts)
Rnd 8: 1 ch, [3 sc, 2 sc in next st, 3 sc] 5 times, join. (40 sts)
Rnd 9: 7 hdc, [2 hdc in next st, 3 hdc] 6 times, 2 hdc in 1 st, 8 hdc, join. (47 sts)
Rnd 10: 7 dc, [2 dc in next st] 16 times, 4 dc in next st, [2 dc in next st] 16 times, 7 dc, join. (82 sts)
Rnd 11: 3 ch (counts as 1 dc), turn, 2 dc in next st, 1 dc, leave remaining sts unworked. (4 sts)
Fasten off and weave in the end.
Big Leaf
Using green, ch 15.
Rnd 1 (RS): Starting in the 2nd ch from hook, working over floral wire, 1 sc, 1 dc, 2 tr, 1 dtr, 2 dtr in next st, 1 dtr, 2 dtr in next st, 1 dtr, 2 tr, 1 dc, 1 hdc, 3 sc in next st, rotate to work into opposite side of ch, 1 hdc, 1 dc, 2 tr, 1 dtr, 2 dtr in next st, 1 dtr, 2 dtr in next st, 1 dtr, 2 tr, 1 dc, 1 sc, join. (33 sts)
Rnd 2: [1 sc, 2 ch] 16 times, [1 sc, 3ch-picot, 1 sc] all into next st, [1 sc, 2 ch] 16 times, join.
Fasten off and weave in the end.
Small Leaf (Make 2)
Using green, ch 12.
Rnd 1 (RS): Starting in the 2nd ch from hook, working over floral wire, 1 sc, 1 dc, 1 tr, 2 dtr, 2 dtr in next st, 1 dtr, 1 tr, 1 dc, 1 hdc, 3 sc in next st, rotate to work into opposite side of ch, 1 hdc, 1 dc, 1 tr, 1 dtr, 2 dtr in next st, 2 dtr, 1 tr, 1 dc, 1 sc, join. (25 sts)
Rnd 2: [1 sc, 2 ch] 12 times, [1 sc, 3ch-picot, 1 sc] in next st, [1 sc, 2 ch] 12 times, join.
Fasten off and weave in the end.
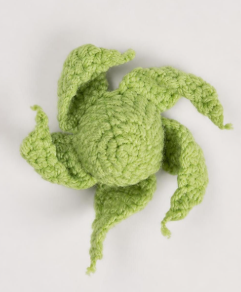
Calyx (Make 1)
Using green, make a magic ring.
Rnd 1 (RS): 1 ch, 5 sc into ring, join. (5 sts)
Rnd 2: 1 ch, [2 sc in next st] 5 times, join. (10 sts)
Rnd 3: 1 ch, [1 sc, 2 sc in next st] 5 times, join. (15 sts)
Rnd 4: 1 ch, [1 sc, 2 sc in next st, 1 sc] 5 times, join. (20 sts)
Rnds 5–7: 1 ch, 20 sc, join.
Now work in rows.
Row 1 (RS): 1 ch, 4 sc, turn. (4 sts)
Row 2: 1 ch, 2 sc in next st, 1 sc, 2 sc in next st, 1 sc, turn. (6 sts)
Rows 3–4: 1 ch, 6 sc, turn.
Row 5: 1 ch, 1 sc2tog, 4 sc, turn. (5 sts)
Row 6: 1 ch, 1 sc2tog, 3 sc, turn. (4 sts)
Row 7: 1 ch, 1 sc2tog, 2 sc, turn. (3 sts)
Row 8: 1 ch, 1 sc2tog, 1 sc, turn. (2 sts)
Row 9: 1 ch, 2 sc, turn.
Row 10: 1 ch, 1 sc2tog, turn. (1 st)
Row 11: 2 ch (does not count as a st), 1 hdc.
Fasten off.
* With RS facing, join yarn in the next unworked st of Round 7. Repeat rows 1 to 11; repeat from * 4 more times.
Fasten off, weave in the end.
Assembly
Insert the floral stem into the center of the first small petal and apply a small amount of hot glue to the top of the stem. Press the petal to the stem, ensuring the glue firmly holds it in place. Wait for the glue to completely dry and cool.
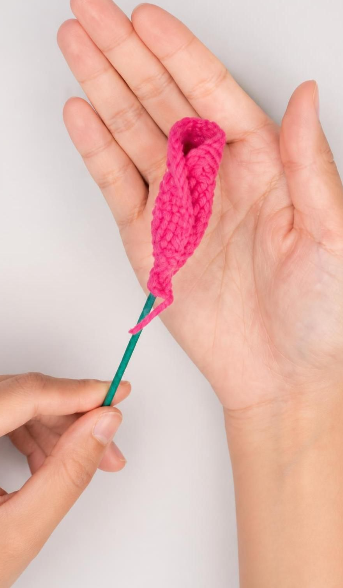
Gradually add more petals around the first petal and stem center, working from small to large. Each new petal should slightly overlap the edge of the previous one to create a layered effect. Apply a small amount of hot glue to the base of each new petal and press it into place.
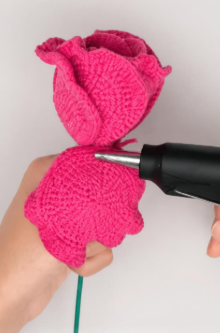
Adjust the angle of each petal as needed to make the flower look natural and full.
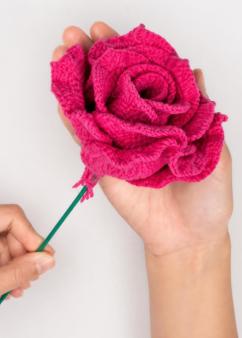
Thread the calyx over the stem, positioning it at the base of the flower. Apply hot glue to secure it to the outer petals.
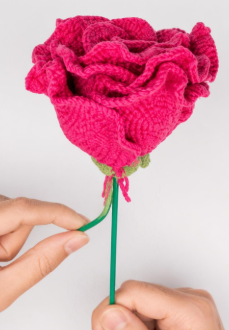
Begin wrapping the stem in green yarn, starting below the calyx. Place one large leaf between two small leaves, wrap with green yarn, and twist the wire to secure the leaves at the ends. Then wrap the leaves to the stem, approximately 10cm (4in) below the petals.
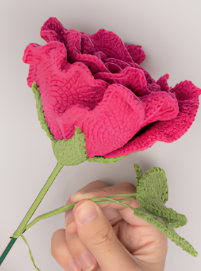
Wrap the stem with green yarn from the petal base to the end. Apply hot glue to the end of the stem to secure the yarn, then cut the yarn.
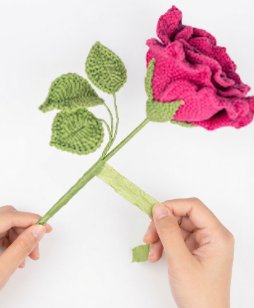
Ensure all petals are securely fixed. If any petals are loose, reapply hot glue and press to secure. Make final adjustments to the overall shape of the flower, ensuring it looks natural.
Tip
To stay safe when using hot glue, apply small amounts and wait for it to cool before moving on. Alternatively, stitch the flowers together for added precision.
Final Thoughts
A Thai rose is as much a small assembly project as it is a crochet pattern — the petals themselves use fairly simple, repetitive increases, but the finished look comes entirely from how patiently you layer, curve, and glue them together afterward. Take your time with the assembly stage especially; that’s where a stack of flat petals actually becomes a rose.
Mastering the crochet thai rose opens up endless possibilities for creating handmade bouquets that last a lifetime.